> ## Documentation Index
> Fetch the complete documentation index at: https://atcyrus.com/docs/llms.txt
> Use this file to discover all available pages before exploring further.
# OpenAI
> How to configure OpenAI for use with Cyrus
Set up OpenAI so Cyrus can use OpenAI models when processing your issues. You can connect via an **API Key** or a **ChatGPT/Codex Subscription**.
Once configured, you can make OpenAI your [default model provider](/providers/default-model-provider).
***
## Open the OpenAI configuration
Navigate to [app.atcyrus.com/settings/integrations](https://app.atcyrus.com/settings/integrations).
Find the **OpenAI** tile, click the **dropdown** on the right side of the tile, and select **Configure**.
At the top of the configuration modal you'll see a tab selector — pick **API Key** or **ChatGPT/Codex Sub** depending on how you'd like to authenticate.
***
## Supported models
Cyrus supports OpenAI's Codex models. Set a model on a per-issue basis with a Linear label or a `[model=...]` description tag — see [Default Model Provider](/providers/default-model-provider) for syntax.
| Model | Notes |
| --------------- | ----------------------------------------------------------------------------------------------------- |
| `gpt-5.5` | Latest frontier model. Unifies the Codex and non-Codex tracks — there is no separate `gpt-5.5-codex`. |
| `gpt-5.3-codex` | Default Codex model. |
| `gpt-5.2-codex` | Used as the automatic fallback. |
| `gpt-5-codex` | Earlier Codex generation. |
| `gpt-5` | Earlier non-Codex GPT-5. |
Cyrus accepts any model name matching `gpt-*-codex` or `gpt-*`, so newer Codex models can be selected by name as soon as OpenAI releases them.
**Example — pin a specific Codex model on one issue:**
```text theme={null}
[agent=codex]
[model=gpt-5.3-codex]
```
Or via labels: `codex` + `gpt-5.3-codex`.
***
## API key setup
Go to [platform.openai.com](https://platform.openai.com/) and sign in with your OpenAI account. If you don't have one, create a free account first.
Navigate to **API keys** in the left sidebar, or go directly to [platform.openai.com/api-keys](https://platform.openai.com/api-keys).
Click **Create new secret key**. Give it a descriptive name like `cyrus` so you can identify it later.
Your new key will be displayed once. Copy it immediately and store it somewhere safe — you won't be able to see it again.
Back in the Cyrus OpenAI configuration modal (with the **API Key** tab selected), paste your key and save.
If you lose your API key, you'll need to create a new one. OpenAI does not allow you to view existing keys after creation.
### Add billing
OpenAI API keys require a billing method to work. If you haven't already:
1. Go to [platform.openai.com/settings/organization/billing](https://platform.openai.com/settings/organization/billing/overview)
2. Add a payment method
3. Optionally set a usage limit to control costs
***
## ChatGPT/Codex subscription setup
If you have an active ChatGPT or Codex subscription, you can use that instead of a separate API key. The setup differs depending on whether you use a **self-hosted** or **cloud-hosted** runtime.
OpenAI's Terms of Service are friendly towards this type of usage — using your subscription with tools like Cyrus is permitted.
### Self-hosted runtime
When running on a **self-hosted** runtime, you need to authenticate Codex manually on the device:
1. SSH into (or open a terminal on) the machine where Cyrus runs
2. Switch to the same user account that the `cyrus` command-line process runs under
3. Run:
```bash theme={null}
codex login
```
4. Follow the prompts to sign in with your OpenAI account
5. Back in the Cyrus OpenAI configuration modal (with the **ChatGPT/Codex Sub** tab selected), click **I have authenticated** to let Cyrus know you've completed the login
Cyrus doesn't verify the authentication itself — clicking "I have authenticated" simply enables the provider. Make sure `codex login` completed successfully before confirming.
### Cloud-hosted runtime
When running on a **cloud-hosted** runtime, you'll complete a **device authorization flow** through the Cyrus UI:
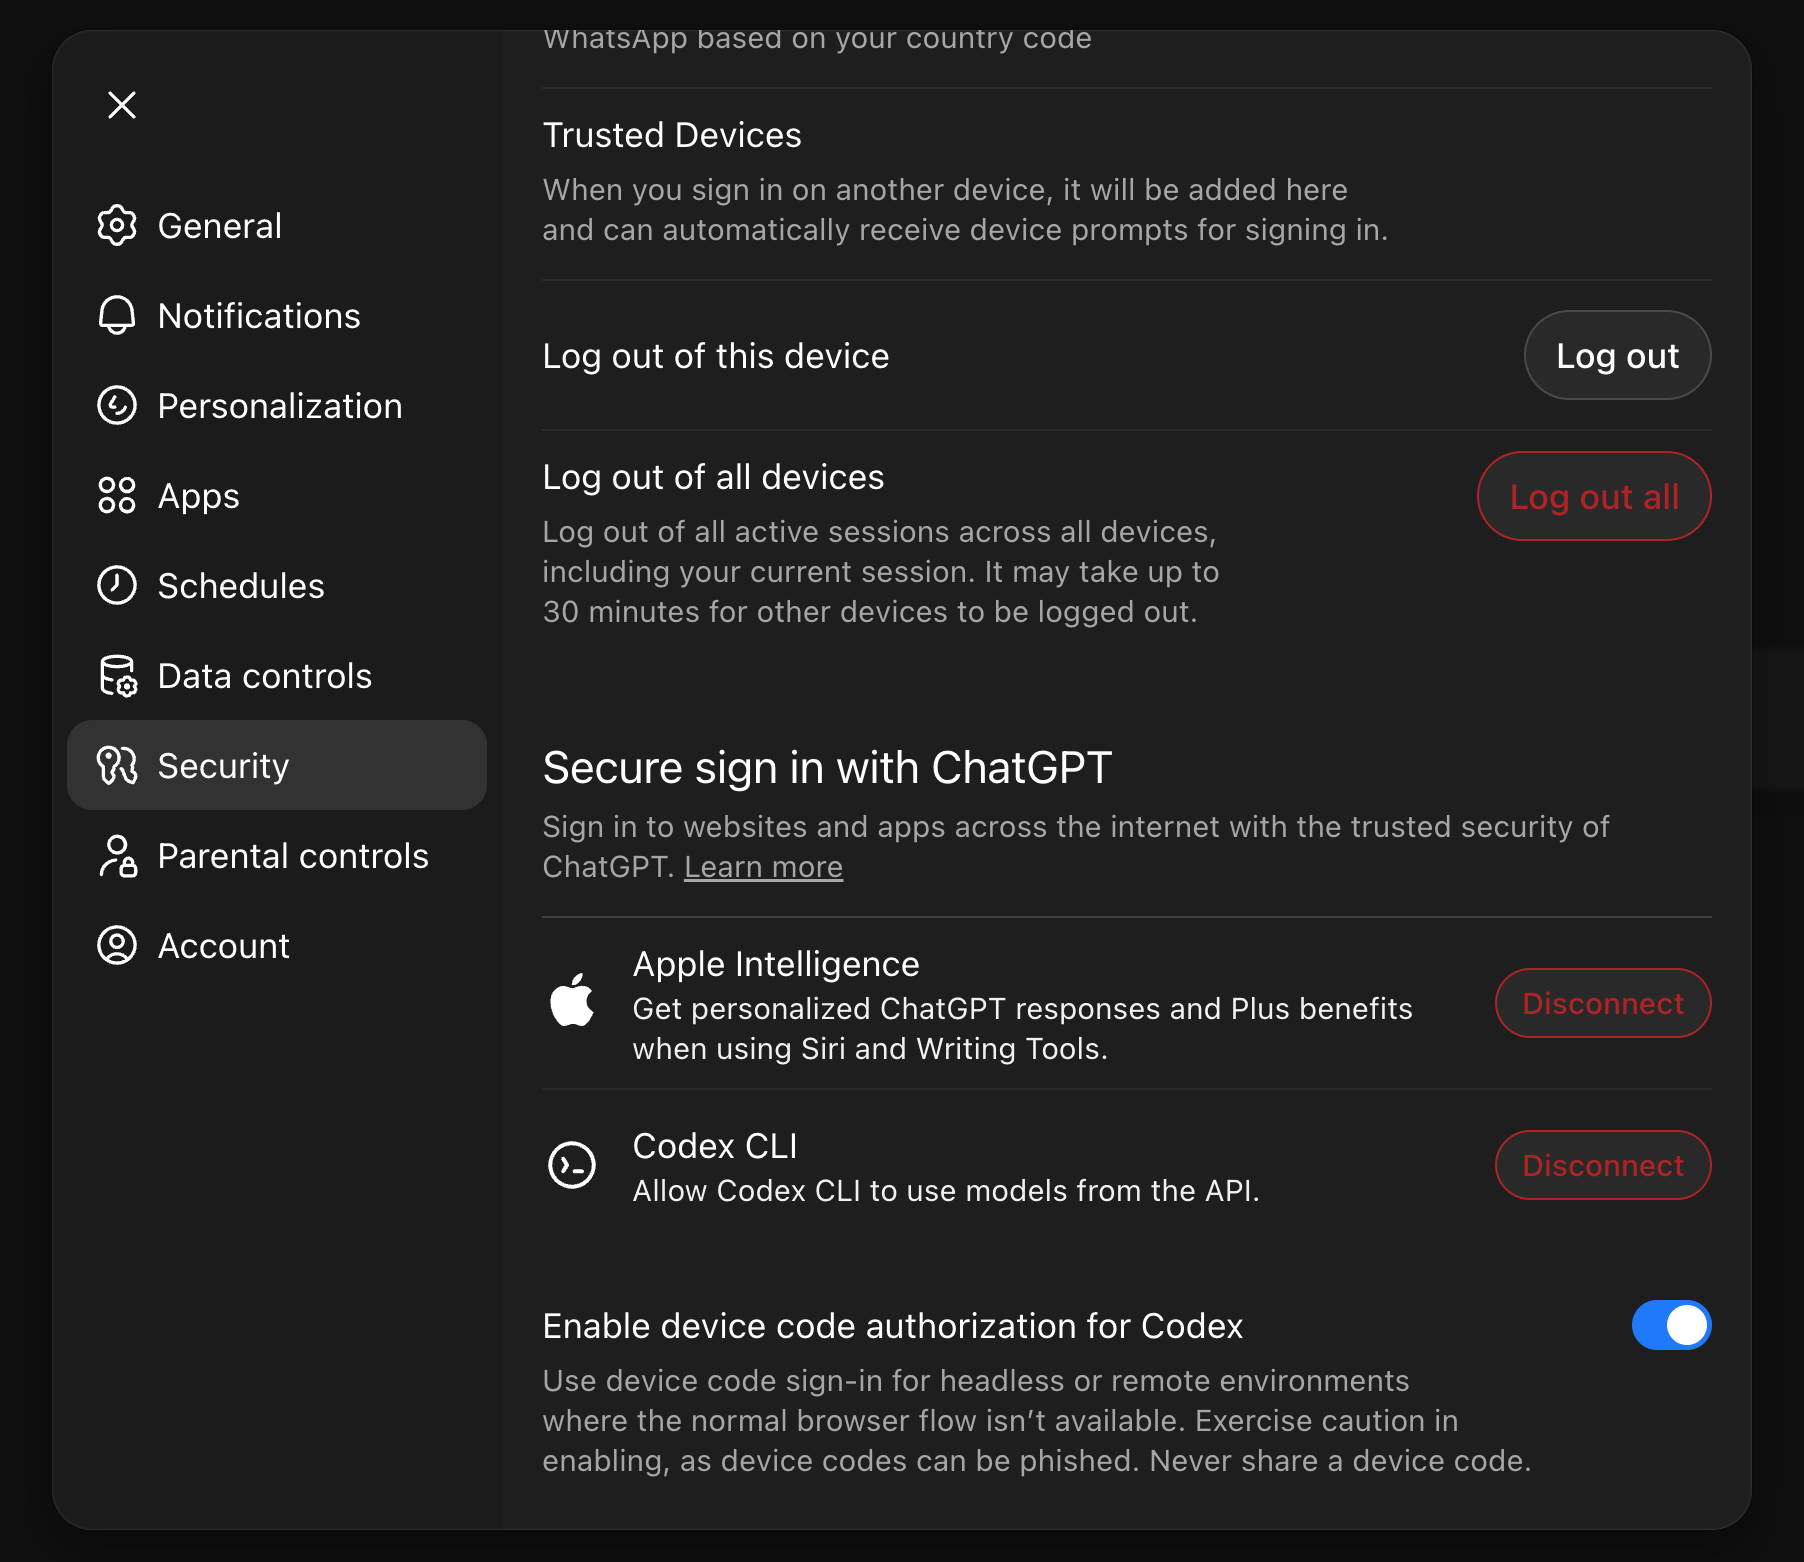
Before starting, make sure device code auth is enabled on your OpenAI account. Go to [chatgpt.com/#settings/Security](https://chatgpt.com/#settings/Security), scroll to the bottom, and toggle on **Enable device code authorization for Codex**.
 In the Cyrus OpenAI configuration modal (with the **ChatGPT/Codex Sub** tab selected), click **Authenticate Codex**.
Cyrus will display a **9-digit code**. Copy it to your clipboard.
Click **Open authentication page** — this will launch OpenAI's device authorization page. Paste the code when prompted.
If you haven't enabled device code authorization yet, you may see a link to enable it. Follow that link first (or use the direct link from Step 1), then return and complete the authorization.
***
## Troubleshooting
**"Invalid API key" error**
* Double-check you copied the full key (it starts with `sk-`)
* Make sure the key hasn't been revoked in the OpenAI dashboard
**"Insufficient quota" error**
* Verify you have billing set up at [platform.openai.com/settings/organization/billing](https://platform.openai.com/settings/organization/billing/overview)
* Check that you haven't exceeded your usage limit
**Device code authorization not working**
* Ensure you've enabled device code auth at [chatgpt.com/#settings/Security](https://chatgpt.com/#settings/Security)
* Try generating a new code — device codes expire after a few minutes
***
## Next steps
To make OpenAI the provider Cyrus uses for every issue, see [Default Model Provider](/providers/default-model-provider).
Get support on Discord
In the Cyrus OpenAI configuration modal (with the **ChatGPT/Codex Sub** tab selected), click **Authenticate Codex**.
Cyrus will display a **9-digit code**. Copy it to your clipboard.
Click **Open authentication page** — this will launch OpenAI's device authorization page. Paste the code when prompted.
If you haven't enabled device code authorization yet, you may see a link to enable it. Follow that link first (or use the direct link from Step 1), then return and complete the authorization.
***
## Troubleshooting
**"Invalid API key" error**
* Double-check you copied the full key (it starts with `sk-`)
* Make sure the key hasn't been revoked in the OpenAI dashboard
**"Insufficient quota" error**
* Verify you have billing set up at [platform.openai.com/settings/organization/billing](https://platform.openai.com/settings/organization/billing/overview)
* Check that you haven't exceeded your usage limit
**Device code authorization not working**
* Ensure you've enabled device code auth at [chatgpt.com/#settings/Security](https://chatgpt.com/#settings/Security)
* Try generating a new code — device codes expire after a few minutes
***
## Next steps
To make OpenAI the provider Cyrus uses for every issue, see [Default Model Provider](/providers/default-model-provider).
Get support on Discord